Autonomys - COMET Ultimate Guide
Prerequisites
The COMET is intended to be run as dedicated Farmer using a Cluster hosted on Docker. This means that you should have a Node and Cluster already set up. Initial plotting directly from a COMET will be slow and I do not recommend it. Running a Node on a COMET may cause issues with farming and is not recommended.
Initial Setup
Purchased from Hake Hardware Shop
Your COMET already has an Ubuntu Minimal installation, however it still requires setup. Navigate to the FE Ubuntu Desktop Wiki and skip to the "First Boot" section. This will help you set up your COMET and prepare it to begin setting up your Farmer. Once complete come back to this wiki.
Purchased Elsewhere
- If you purchased from elsewhere, you will need to create the installation media and install the OS. I recommend the FriendlyElec Ubuntu Minimal OS, and you can follow the FE Ubuntu Desktop Wiki to get it setup. Once complete come back to this wiki.
- You also need to ensure you have at least a 4A 12V PSU if you intend to run 4x NVME drives.
Install Docker
Although you can run a COMET via the CLI, it is best to run Docker. This creates the easiest and fastest method to get up and running. Install Docker only takes a few moments and it is covered in the Install Docker (Linux) Wiki. Once complete come back to this wiki.
Create the Docker Autonomys Network
I deploy all Autonomys related things on the "autonomys-network". Make sure it is created:
sudo docker network create \
  --driver bridge \
  --subnet 172.25.0.0/16 \
  --gateway 172.25.0.1 \
  autonomys-network
Portainer
Portainer is a graphical user interface (GUI) for Docker. I highly recommend using Portainer. I have wikis for both Linux and Windows on how to set up a Host or Agent
- Install Portainer Host/Agent on Linux: Portainer Install
- Portainer Agent w/ Docker Desktop: Docker Desktop Portainer Agent (Windows)
- Portainer Host w/ Docker Desktop: Docker Desktop Portainer Host (Windows)
I recommend running the Portainer Host where ever your Node will be running.
Drive Prep
Power off and install any NVMEs you plan to use for your Farmer if you have not done so already.
Manual Prep
To prep the drives correctly, follow the drive prep wiki:
Automated Prep
I have created a special script which will automatically prep the drives for COMETs. This script will perform the following operations:
- Identify the NVME drives
- Wipe the drives
- Format the drives
- Mount the drives
- Set the appropriate permissions
- Create an FSTAB entry to automatically mount on boot
To use the script, first download the script
curl -o nvme_prep.sh https://raw.githubusercontent.com/hakehardware/scripts/main/nvme_prep.sh
Make the script executable
chmod +x nvme_prep.sh
Run the script with sudo
sudo ./nvme_prep.sh
You will be prompted multiple times. The script will entirely wipe the drives, do not proceed if this is not your intention.
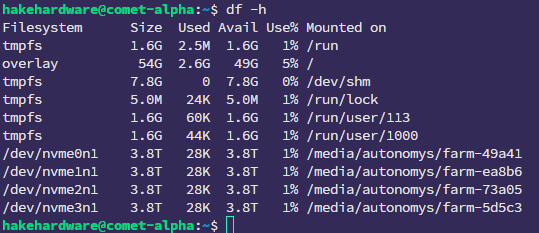
Gather Drive Names
Once the drives have been prepped, grab the mount point names as they will be needed to run the Farmer
df -h

Stack File
Now that the drives have been prepped, it is time to create the Farmer stack file. Open up Portainer and go to the environment for your COMET and create a new stack file. Name the stack autonomys-farmer and then open up the farmer.yaml file on the Hake Hardware GitHub
Update Stack File
Before proceeding make sure to update the following:
- Update to the latest image
- Update the farm paths in the "volumes" section
- Update the NATS IP to point to the server running NATS
- Update your reward address
- Update the paths to your drives
- Update the Timezone
Install Node Exporter (Optional)
I prefer to be able to view metrics about my COMETs, such as RAM, CPU, DISK, Network usage.
