Prepare Farmer Drives
- This guide was created for Autonomys Taurus Testnet and will be updated once mainnet is launched.
- Some of these steps may result in data loss if you select the wrong disk. Always make sure your data is backed up, and you are selecting the appriorate disks.
Ubuntu
Identify Drives
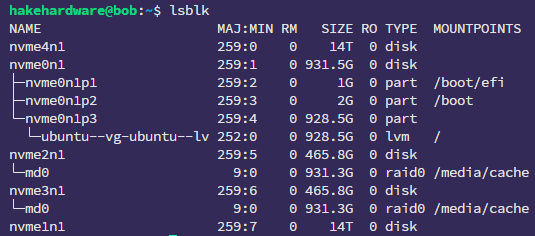
The most important step is identifying your disks. I typically use a combination of knowledge about the size and type of my disks along with data provided by the operating system. To start, list your block devices
lsblk
Here is an example from one of my PCs. I have few NVME drives installed, but knowing that the drives I want to use are 15.6GB
leaves me only 2 options: nvme1n1 and nvme4n1. They are also the only unmounted drives (no mountpoints). Typically if a
drive has a mountpoint then it is in use. Drives mounted to / or /boot are typically OS drives, and you should steer clear
of those.
If you are still unsure, you can always mount the drive and check the contents of the drive. Either way be absolutely sure before proceeding to the next step.
Wipe the Drives
I prefer to use no partitions for my Autonomys farmer drives. The following command is used to erase filesystem signatures or metadata from a specified device, effectively "wiping" the device of any filesystems or partitioning information.
wipefs --all /dev/<DEVICE>
Format the Drives
The following command will wipe the drives and set them up in the most optimal way for Autonomys.
sudo mkfs.ext4 -m 0 -T largefile4 /dev/<DEVICE>
mkfs.ext4the recommended file system for Linux is ext4-m 0sets the reserved space to 0. Reserve space is not needed for SSDs used only for Autonomys-T largefile4optimizes the inode and blocksize for large files like Autonomys uses. This gives you more space to work with.
Create a Mount Point
The drive is now ready to be mounted. In my guides I mount my farmer drives to /media/autonomys. You can choose a
different location but be sure to update any commands that reference this path.
Create the parent directory for our mount points
sudo mkdir /media/autonomys
Then create a folder for each drive. I like to use the pattern of farm-<LAST 5 of UUID>. You can get the UUID of each
drive by running
lsblk -f
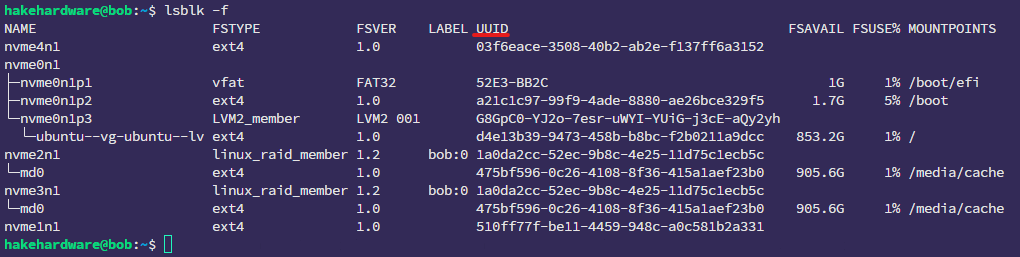
This is personal preferance. You can name your folder something like farm-1, farm-2, etc.. if you wish. Once you decide
on a naming method you can create the mount points with
sudo mkdir /media/autonomys/<FARM NAME>
This is the result for my two drives

Create an FSTAB entry
The drives must be added to the FSTAB in order to be automatically mounted on boot. Use lsblk -f to get the UUIDs of the
drives and add them to the FSTAB. Open up the FSTAB
sudo nano /etc/fstab
Move to the bottom and create a new section called # Autonomys Farms and add entry for each drive following this format:
# Autonomys Farms
UUID=<UUID> /media/autonomys/<MOUTN POINT> ext4 defaults,noatime,nofail  0 0
The result for my drives is

Then update systemd to load the latest FSTAB changes
sudo systemctl daemon-reload
Mount the Drive
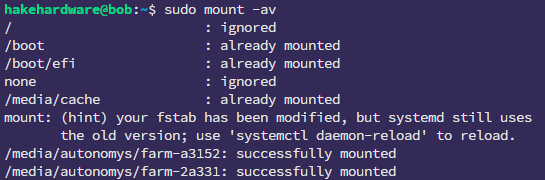
Manually mount the drives
sudo mount -av
The drives should be mounted. This only needs to be done once, as the drives will be mounted automatically at boot in the future.
The result (I had not run daemon-reload first)
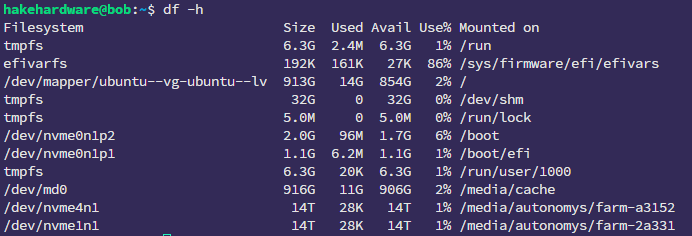
Verify
Verify the drives are mounted and look correct
df -h
Set Permissions
The final step is to set the appropriate permissions for Autonomys to access the drives. This involves setting the ownership of the drives to the current user
sudo chown -R $USER:$USER /media/autonomys/*