NATS (clusters)
This guide was created for Autonomys Taurus Testnet and will be updated once mainnet is launched.
Prerequisites
Helpful Guides
NATS will run in Docker, and is best managed with Portainer.
- Install Docker on Ubuntu: Docker Install
- Install Portainer on UbuntuPortainer Install
Docker network
NATS will be deployed on the autonomys-network Docker network which I create for all Autonomys related containers. If that container does not exist, make sure to create it
- Linux
- Windows
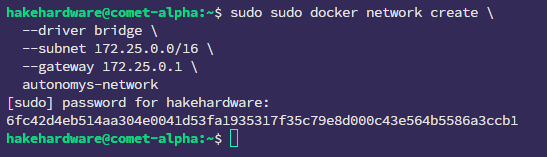
Create the network
sudo docker network create \
  --driver bridge \
  --subnet 172.25.0.0/16 \
  --gateway 172.25.0.1 \
  autonomys-network
Press win + x and then select "Terminal" to open a Terminal, then create the network
docker network create --driver bridge --subnet 172.25.0.0/16 --gateway 172.25.0.1 autonomys-network
![]()
This creates a new network called "autonomys-network" using the subnet 172.25.0.0/16 and the gateway 172.25.0.1.
NATS Config
In order to deploy NATS, a config file must be created. Because NATS is only used with a cluster, I usually add it under the "autonomys" directory that is created when configuring a cluster.
- Linux
- Windows
Create the nats folder to store the config
mkdir -p ~/autonomys/nats
The -p will create the "autonomys" folder automatically if it does not exist. Then create the nats config
echo "max_payload = 2MB" > ~/autonomys/nats
Make note of the full path to the nats.config as it will be needed when deploying the container
pwd
Note that in Windows for Docker when specifying a drive it will be represented like /c/path/to/nats instead fo c:\path\to\nats
Create the nats folder at the location in which you want the nats config to be located. Then right click and select "Open in Terminal". Then create the nats.config
echo "max_payload = 2MB" | Out-File -FilePath .\nats.config -Encoding UTF8
Make note of the full path to the nats.config as it will be needed when deploying the container
pwd
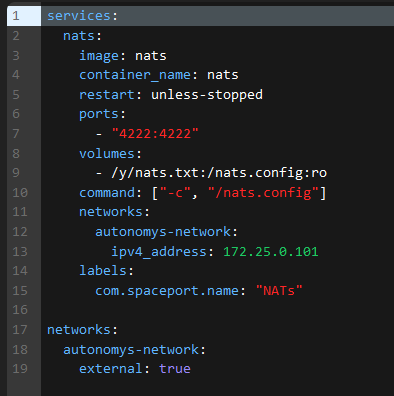
Stack File
In Portainer, create a new Stack file called "nats". I prefer to give NATS it's own stack file, however it could be included in your cluster stack file. Next, open up the NATS example file and copy the contents and paste it into Portainer.
Updates
Make sure to update the following
- Update the path to your
nats.config - (optional) Update the Spaceport Labels
- If not using the
autonomys-networkupdate it to the appropriate network
Example