Prepare Disks in WSL
This guide involves steps which will wipe a disk and format it with a new file system. All data on the disk will be lost. Ensure the correct disk is being wiped and back up any data prior to proceeding.
Install Ubuntu (WSL)
Ubuntu WSL must be installed in order to prep the disks. This may seem like a lot of complex steps, but this guide will provide detailed steps.
Identify Disks
Before the disks can be prepared they must be identified. This guide will be passing a physical disk through directly to WSL. Press WIN + x and then select "Terminal (Admin)" or right click on the start menu and select "Terminal (Admin)". Then execute the following command to identify the disks
GET-CimInstance -query "SELECT * from Win32_DiskDrive"

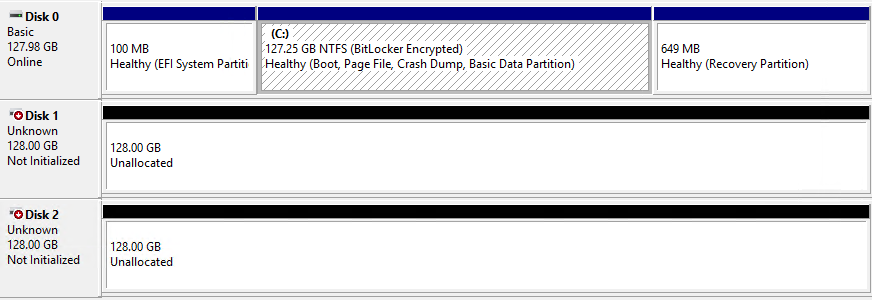
This command lists out the Device IDs of the physical disks on the system which will be needed to mount the disks in WSL. Notice that the IDs follow a pattern like \\.\PHYSICALDRIVE0, \\.\PHYSICALDRIVE1, and \\.\PHYSICALDRIVE2. If you are unsure which disks should be used for the Farm drives, an easy way is press WIN + x and then select "Disk Management". This is a graphical representation of the disks, and include labels such as Disk 0, Disk 1, etc... The numbers in these labels correspond to the numbers in the IDs. Make note of which numbers will need to be mounted to WSL as Farm disks.
Automatic Mounting to WSL
By default no physical disks are attached to WSL. In order to see the disks in WSL they need to be attached. In order to have them automatically attached to WSL on boot the action can be automated as a "Scheduled Task". In the Windows search menu enter "Task Scheduler" and open the application.
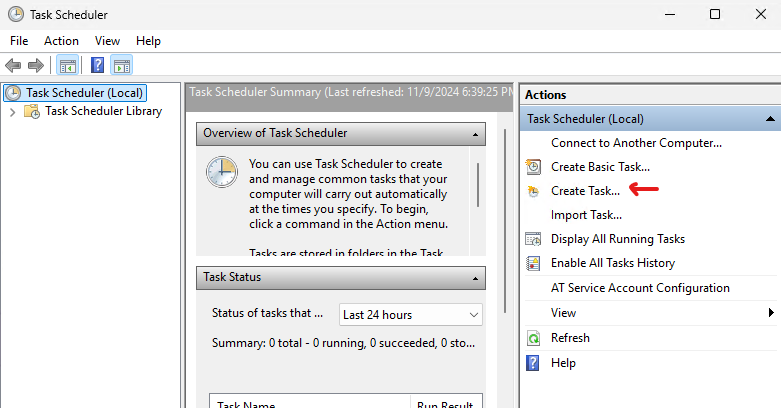
Then on the right side click "Create Task..."
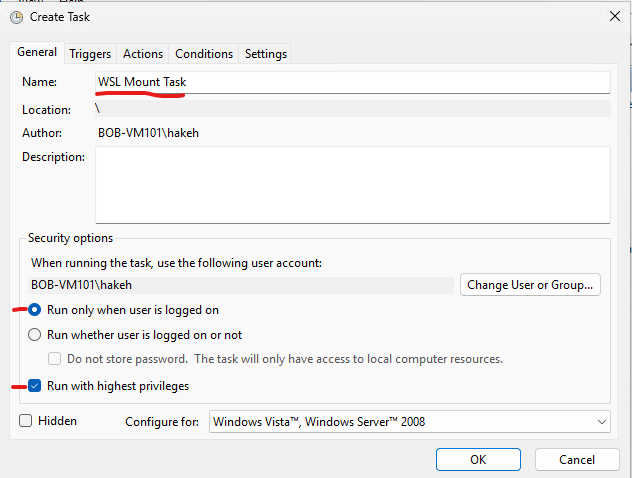
On the "General" tab:
- Set the Name to "WSL Mount Task"
- Check "Run only when user is logged on"
- Check "Run with highest privileges"
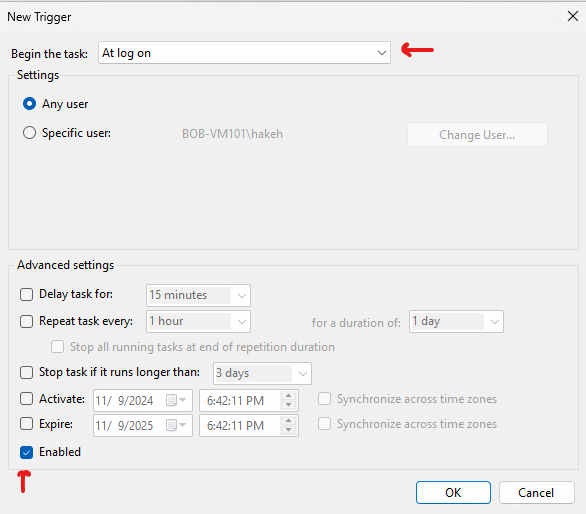
On the "Triggers" tab:
- Select "New..."
- From the "Begin the task" dropdown, select "At log on"
- Make sure it is enabled
Click "OK" when done.
On the "Actions" tab:
- Select "New..."
- In the "Program/script" input enter
cmd.exe - In the "Add arguments" input enter
/c wsl --mount \\.\PHYSICALDRIVE0 --bare(replace PHYSICALDRIVE0 with the appropriate disk number)
Repeat steps 1-3 for each physical drive that needs to be attached.
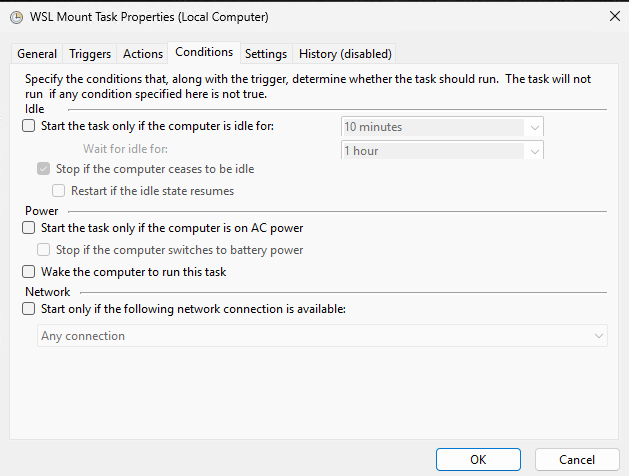
On the "Conditions" tab ensure all boxes are unchecked.
On the "Settings" tab:
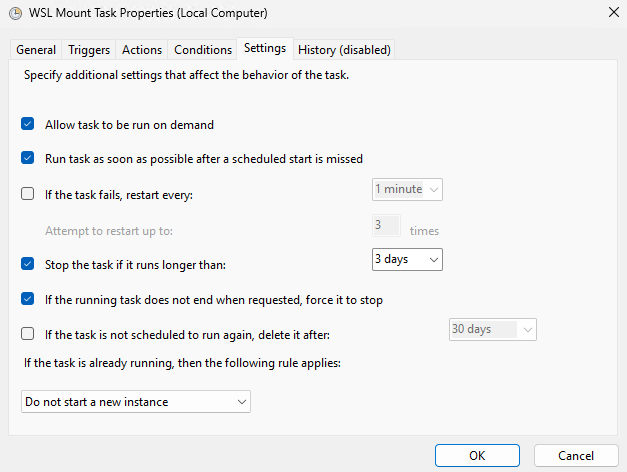
- Check "Allow task to be run on demand"
- Check "Run task as soon as possible after a scheduled start is missed"
- Check "Stop the task if it runs longer than 3 days"
- Check "If the task does not end when requested for it to stop"
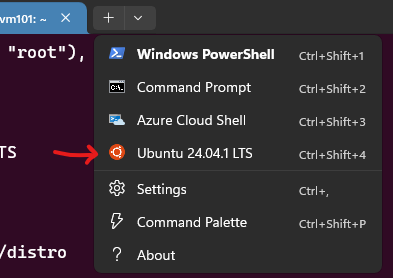
Then click "OK" to save the task. This task will run when the the specified user logs into Windows, ensuring that the disks are always available to WSL. To verify that the rule works, reboot the PC and log back in. You may notice a cmd.exe terminal window open momentarily while the task executes. Then press WIN + x and select Terminal. In the top click the "Down Arrow" and select "Ubuntu".
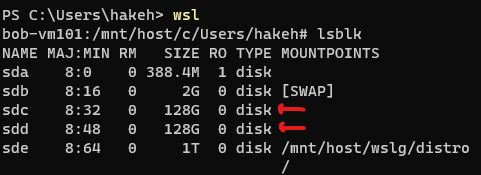
Once logged into Ubuntu, list the block devices:
lsblk
Any disks specified should now be attached in WSL.
Automatically Mount Disk
The disks are now attached to WSL, but they still need to be formatted to ext4 and mounted in Ubuntu. Identify the disk "NAME" printed out from lsblk. In the picture above it is "sdc" and "sdd". For each disk wipe and format with the following commands (when prompted for a password use the one you created when install Ubuntu):
Wipe Disk
sudo wipefs --all /dev/<NAME>
Format
sudo mkfs.ext4 -m 0 -T largefile4 /dev/<NAME>
I prefer to mount my disks to /media/autonomys and then use "Farm-" plus the last 5 of the UUID of the drive. Start by printing out and saving the UUID of each disk:
lsblk -f

Create the mount folder
sudo mkdir /media/autonomys
Create the farm subfolders
sudo mkdir /media/autonomys/farm-1c524
sudo mkdir /media/autonomys/farm-92587
Create an entry for each drive in the /etc/fstab to automatically mount the drives on boot
sudo nano /etc/fstab
Then add the entries to the bottom
UUID=47e24e63-be0d-4453-afd1-8371d9d1c524 /media/autonomys/farm-1c524 ext4 defaults,noatime,nofail 0 0
UUID=ea913e69-079b-43d2-8fd5-cab145092587 /media/autonomys/farm-92587 ext4 defaults,noatime,nofail 0 0
Then press CTRL + x, then y, then enter to save the file. Reload the daemon:
sudo systemctl daemon-reload
Then confirm the disks mount:
sudo mount -av
Permissions
The disks need to have permissions set to work with Docker and Autonomys. Run the following command to set the appropriate permissions:
sudo chown -R nobody:nogroup /media/autonomys*
Verify
Verify everything is working by exiting Ubuntu, rebooting the PC, and then logging back into Ubuntu. Use the following command to list the mounted disks:
df -h
The disks that were specified in the FSTAB should be listed as mounted.
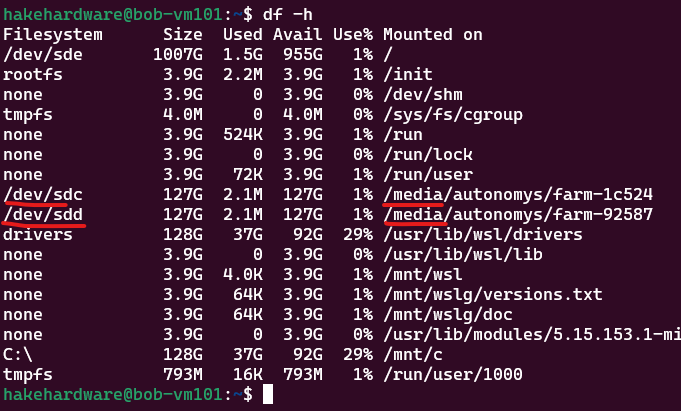
The disks are now ready to be added to the Farmer after the Node is deployed.